Christmas Tree Cakes Recipe
Introduction
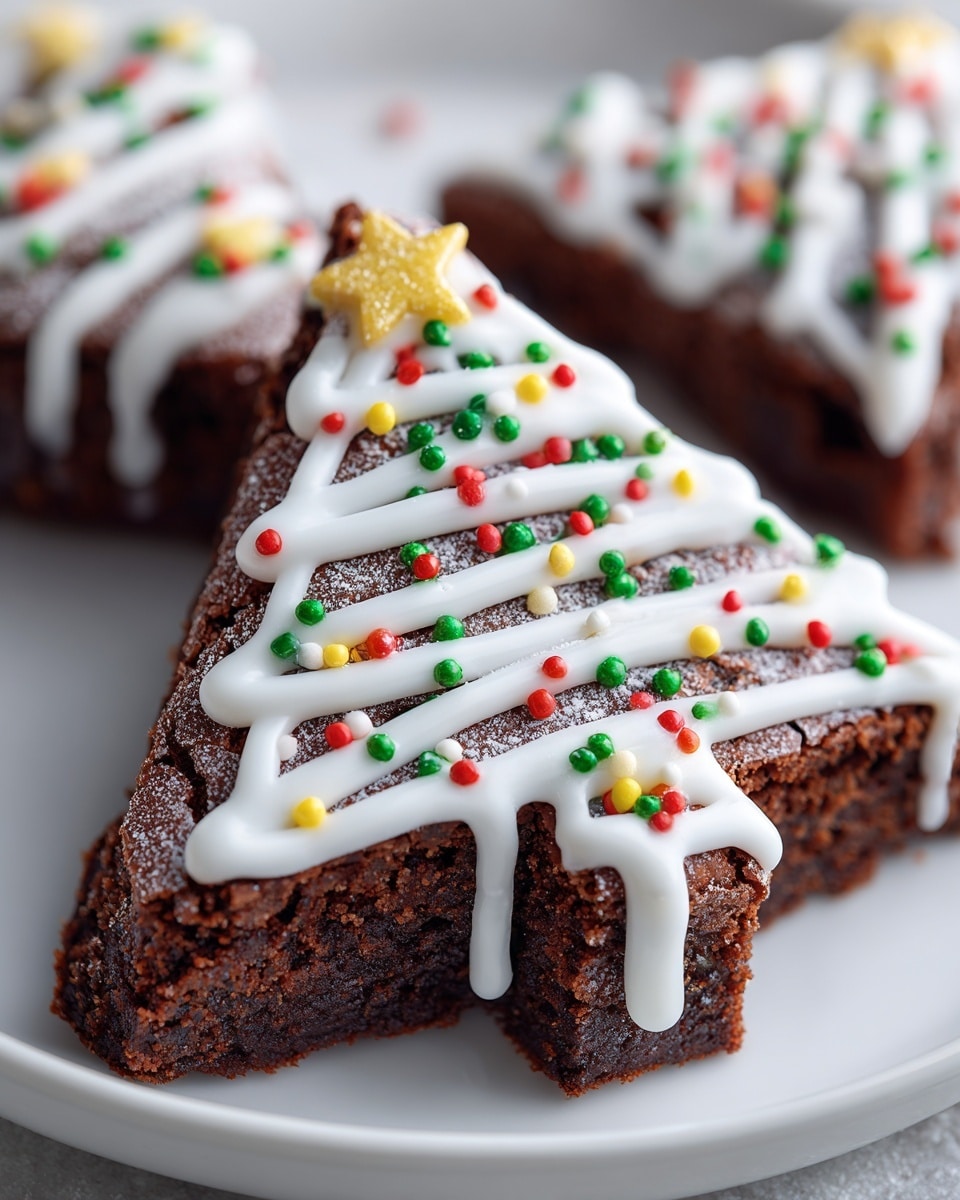
Celebrate the holidays with these charming Christmas tree cakes, perfect for festive gatherings or as a delightful gift. Moist cocoa sponge layered with vibrant green buttercream and decorated with colorful sprinkles makes these treats both beautiful and delicious.
Ingredients
- 200ml vegetable oil, plus extra for the tin
- 80g cocoa powder
- 250g plain flour
- 2 tsp baking powder
- 1 tsp bicarbonate of soda
- 250g light brown soft sugar
- 225ml natural yogurt
- 2 tsp vanilla extract
- 2 eggs
- 250g salted butter, softened
- 400g icing sugar
- 1 tsp vanilla extract
- 1 tbsp milk
- Green food colouring gel
- Sprinkles or sweets of your choice (star and ball shapes work well for the tree topper and baubles)
Instructions
- Step 1: Preheat the oven to 180°C (160°C fan)/gas mark 4. Oil a 22 x 32 cm baking tin and line it with baking parchment. In a heatproof bowl, stir the cocoa powder into 125ml of hot water from the kettle until smooth, then leave to cool.
- Step 2: In a separate bowl, combine the plain flour, baking powder, bicarbonate of soda, light brown sugar, and ½ tsp salt. Shake the bowl to reveal any lumps of sugar, then break these up between your fingers and mix again to fully combine.
- Step 3: Add the vegetable oil, natural yogurt, vanilla extract, and eggs to the cooled cocoa paste. Whisk until smooth.
- Step 4: Pour the wet ingredients into the dry ingredients and whisk until you have a loose, lump-free batter. Pour the batter into the prepared tin and bake in the centre of the oven for 25 minutes, or until a skewer inserted into the middle comes out clean. Allow the cake to cool completely in the tin.
- Step 5: To make the buttercream, beat the softened butter, icing sugar, vanilla extract, and milk together using an electric whisk until smooth and creamy. Add a few drops of green food colouring and mix again until the color is bright and even.
- Step 6: Remove the cooled sponge from the tin and place it on a large board or tray with one short edge facing you. Cut the sides at an angle to form a triangular tree shape, then trim the short edge to create a trunk. Use the offcuts to assemble a second tree and its trunk on a separate board or tray by joining angled pieces at their longest sides.
- Step 7: Divide the green buttercream between two piping bags fitted with star nozzles. Pipe the buttercream over the trees as desired, leaving the trunks plain. Decorate with sprinkles or sweets to represent ornaments and tree toppers.
Tips & Variations
- For a richer flavor, substitute natural yogurt with Greek yogurt or sour cream.
- If you don’t have piping bags with star nozzles, a simple round nozzle or even spreading the buttercream with a knife works well.
- Try alternative food colouring like matcha powder for a natural green tint.
- Use mini chocolate chips or edible glitter for extra festive decorations.
Storage
Store the decorated Christmas tree cakes in an airtight container at room temperature for up to four days. You can freeze the baked but uniced sponge, wrapped well, for up to three months. Thaw completely before decorating. To refresh, let the cake come to room temperature before serving.
How to Serve
Serve this delicious recipe with your favorite sides.
FAQs
Can I make the cakes ahead of time?
Yes, you can bake the sponge up to three months in advance and freeze it wrapped tightly. Decorate with buttercream and sprinkles just before serving to keep them fresh and vibrant.
What can I use instead of vegetable oil?
You can substitute vegetable oil with melted butter or a mild-flavored oil like sunflower oil for a slightly different taste and texture. Just use the same quantity as the recipe calls for.
PrintChristmas Tree Cakes Recipe

Delight in festive fun with these homemade Christmas tree cakes, featuring a moist cocoa sponge and vibrant green buttercream decorated with colorful sprinkles or sweets. Perfect for holiday celebrations, these charming cakes are cut and shaped into festive trees, making both an impressive centerpiece and a delicious treat.
- Prep Time: 20 minutes
- Cook Time: 25 minutes
- Total Time: 45 minutes
- Yield: 2 Christmas tree cakes 1x
- Category: Baking
- Method: Baking
- Cuisine: British
Ingredients
Cake Sponge
- 200ml vegetable oil, plus extra for the tin
- 80g cocoa powder
- 250g plain flour
- 2 tsp baking powder
- 1 tsp bicarbonate of soda
- 250g light brown soft sugar
- 225ml natural yogurt
- 2 tsp vanilla extract
- 2 eggs
Buttercream Frosting
- 250g salted butter, softened
- 400g icing sugar
- 1 tsp vanilla extract
- 1 tbsp milk
- Green food colouring gel
- Sprinkles or sweets (star and ball shapes recommended for tree topper and baubles)
Instructions
- Preheat and Prepare Tin: Heat the oven to 180°C (160°C fan)/gas mark 4. Grease a 22 x 32cm baking tin with vegetable oil and line it with baking parchment to prevent sticking.
- Make Cocoa Paste: Put the cocoa powder into a heatproof bowl. Stir in 125ml of hot water from the kettle to create a smooth cocoa paste. Leave it to cool to room temperature.
- Mix Dry Ingredients: In a large bowl, combine the plain flour, baking powder, bicarbonate of soda, light brown soft sugar, and ½ teaspoon of salt. Shake and mix thoroughly to break up any lumps of sugar and fully incorporate all ingredients.
- Combine Wet Ingredients: To the cooled cocoa paste, add the vegetable oil, natural yogurt, vanilla extract, and eggs. Whisk together until the mixture is smooth and well combined.
- Make Batter: Pour the wet ingredients into the dry ingredients bowl and whisk until you have a loose, lump-free batter.
- Bake the Cake: Pour the batter into the prepared baking tin and bake in the center of the preheated oven for about 25 minutes. Check doneness by inserting a skewer into the middle; it should come out clean. Once baked, leave the sponge to cool completely in the tin. The baked sponge can be wrapped and frozen for up to three months.
- Prepare Buttercream: Using an electric whisk, beat the softened butter, icing sugar, vanilla extract, and milk together until the mixture is smooth and creamy. Add a few drops of green food colouring gel and continue mixing until the buttercream is a bright, even green color.
- Shape the Cakes: Carefully lift the cooled sponge from the tin and place it on a large board or tray. Rotate the cake so one of the short edges faces you. Cut the sides on an angle to form a triangular Christmas tree shape. Trim the short edge at the front to create a cake trunk. Use the angled offcuts from the sides to build a second tree on another tray by joining the angled pieces at their longest sides. Use additional offcuts to form the trunk for the second tree.
- Decorate the Trees: Divide the green buttercream between two piping bags fitted with star nozzles. Pipe the buttercream onto the shaped cakes creatively, leaving the trunks un-iced. Decorate the trees by adding sprinkles or sweets as ornaments, such as stars and balls for toppers and baubles.
- Storage: Store the decorated Christmas tree cakes in an airtight container. They will remain fresh for up to four days.
Notes
- The cocoa paste must be cooled before mixing with other wet ingredients to prevent scrambling the eggs.
- Using star and ball-shaped sweets enhances the festive look as tree toppers and ornaments.
- Buttercream can be tinted with other colors if desired for extra festive creativity.
- These cakes freeze well before decorating; wrap tightly to preserve freshness.
- Ensure the cake is completely cool before applying buttercream to avoid melting the frosting.
Keywords: Christmas cake, holiday baking, buttercream frosting, festive cakes, cocoa cake, party cakes, holiday desserts