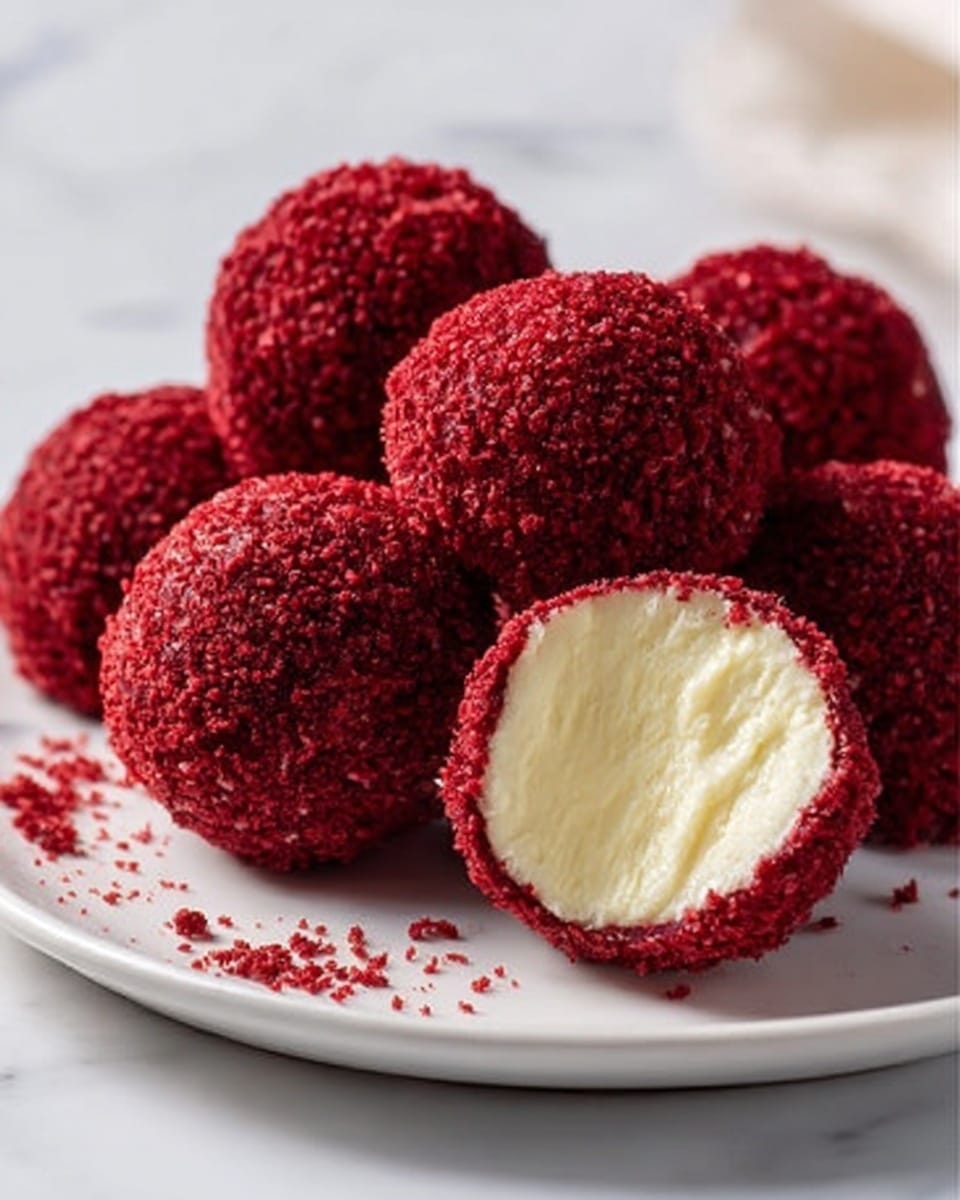
Red Velvet Cheesecake Bites Recipe
Introduction
Red Velvet Cheesecake Bites are a delightful treat that combines the rich flavor of red velvet cake with creamy cheesecake in a bite-sized form. Perfect for parties or a sweet snack, these no-fuss bites offer a perfect balance of texture and taste.
Ingredients
- 1 box red velvet cake mix
- Ingredients listed on cake mix packaging
- 16 ounces cream cheese, room temperature
- 4 tablespoons butter, room temperature
- 1/2 cup powdered sugar
- 2 cups graham crackers, crushed
- 1 teaspoon vanilla extract
Instructions
- Step 1: Preheat the oven to 350°F and line or grease two 8-inch cake pans.
- Step 2: Prepare the red velvet cake according to the packaging instructions. Bake and then allow it to cool completely.
- Step 3: Once cooled, crumble the cake by hand until it resembles coarse sand. If the cake feels too moist, break it into small chunks and spread on a lined baking sheet. Dry it in the oven at 350°F for 5 to 6 minutes.
- Step 4: In a large mixing bowl, combine the cream cheese, butter, and powdered sugar. Use an electric mixer to beat until the mixture is fluffy and aerated.
- Step 5: Place graham crackers in a ziplock bag and crush them finely with a rolling pin. Add the crushed graham crackers and vanilla extract to the cream cheese mixture and mix well until fully incorporated.
- Step 6: Use a 2 teaspoon cookie scoop to portion out cream cheese balls. Roll each ball between your hands to form smooth, round bites. Place them on a lined baking sheet or plate and refrigerate for 1 hour to set.
- Step 7: After chilling, roll each cream cheese bite in the red velvet cake crumbs until fully coated. Shape them into smooth, round balls with your hands if needed.
- Step 8: Enjoy these cheesecake bites immediately or store them in the refrigerator until ready to serve.
Tips & Variations
- For extra flavor, add a pinch of cinnamon or cocoa powder to the cream cheese mixture.
- If you prefer a sweeter bite, increase the powdered sugar slightly, but be careful not to overpower the cream cheese.
- Try rolling the bites in chopped nuts or shredded coconut instead of cake crumbs for a different texture.
Storage
Store the cheesecake bites in an airtight container in the refrigerator for up to 5 days. To serve, let them sit at room temperature for about 10 minutes for the best texture. These bites do not freeze well as the texture may become grainy upon thawing.
How to Serve
Serve this delicious recipe with your favorite sides.
FAQs
Can I make these bites without a red velvet cake mix?
Yes, you can use any red velvet cake recipe or mix you prefer. Just ensure the cake is fully baked and cooled before crumbling for coating.
How long do the cheesecake bites need to chill?
They should be refrigerated for at least 1 hour to allow the cream cheese mixture to firm up, making them easier to roll and coat.
PrintRed Velvet Cheesecake Bites Recipe

Red Velvet Cheesecake Bites combine the rich, velvety flavor of red velvet cake with creamy cheesecake in a bite-sized treat. These no-bake truffles feature a soft cream cheese center coated in crumbled red velvet cake, making them perfect for parties or dessert tables.
- Prep Time: 20 minutes
- Cook Time: 35 minutes
- Total Time: 1 hour 55 minutes
- Yield: About 24 bites 1x
- Category: Dessert
- Method: Baking
- Cuisine: American
Ingredients
Red Velvet Cake
- 1 box red velvet cake mix
- Ingredients indicated on cake mix packaging (usually eggs, oil, and water)
Cream Cheese Mixture
- 16 ounces cream cheese, room temperature
- 4 tablespoons butter, room temperature
- 1/2 cup powdered sugar
- 1 teaspoon vanilla extract
Coating
- 2 cups graham crackers, crushed
Instructions
- Preheat and prepare pans: Preheat your oven to 350°F (175°C) and either line or grease two 8-inch cake pans to prevent sticking.
- Bake the red velvet cake: Prepare the red velvet cake according to the package instructions, then bake it in the prepared pans. Once baked, allow the cake to cool completely.
- Crumble and dry cake crumbs: When cool, crumble the cake by hand until it resembles coarse sand. If too moist, break it into chunks, spread on a lined baking sheet, and bake at 350°F for 5-6 minutes to dry it out.
- Make the cream cheese mixture: In a large bowl, combine the room temperature cream cheese, butter, and powdered sugar. Using an electric mixer, beat the mixture until it becomes fluffy and aerated.
- Prepare coating base: Crush graham crackers into a fine powder using a rolling pin inside a ziplock bag. Incorporate the crushed graham crackers and vanilla extract into the cream cheese mixture, mixing well until fully combined.
- Scoop and chill balls: Using a 2 teaspoon cookie scoop, portion out the cream cheese mixture into balls. Roll each ball between your hands until smooth and round, then place on a lined baking sheet or plate. Refrigerate for 1 hour to firm up.
- Coat with red velvet crumbs: After chilling, roll each cream cheese ball in the prepared red velvet cake crumbs, coating all sides. Use your hands to perfect the shape as needed.
- Serve or store: Enjoy immediately or refrigerate until ready to serve. These bites are best served chilled.
- Share your feedback: If you try this recipe, return to share your experience and star ratings in the comments.
Notes
- If the cake crumbs are too moist for coating, drying them in the oven ensures a better texture for rolling the cheesecake balls.
- The bites can be stored in the refrigerator for up to 3 days in an airtight container.
- For extra flavor, consider dusting the finished bites with a light sprinkling of cocoa powder or additional powdered sugar.
- Room temperature cream cheese and butter ensure smooth mixing and better texture.
Keywords: red velvet cheesecake bites, no bake cheesecake balls, red velvet truffles, dessert bites, cheesecake truffles