
Classic Sourdough Bread Recipe with Crispy Crust and Natural Leavening Recipe
Introduction
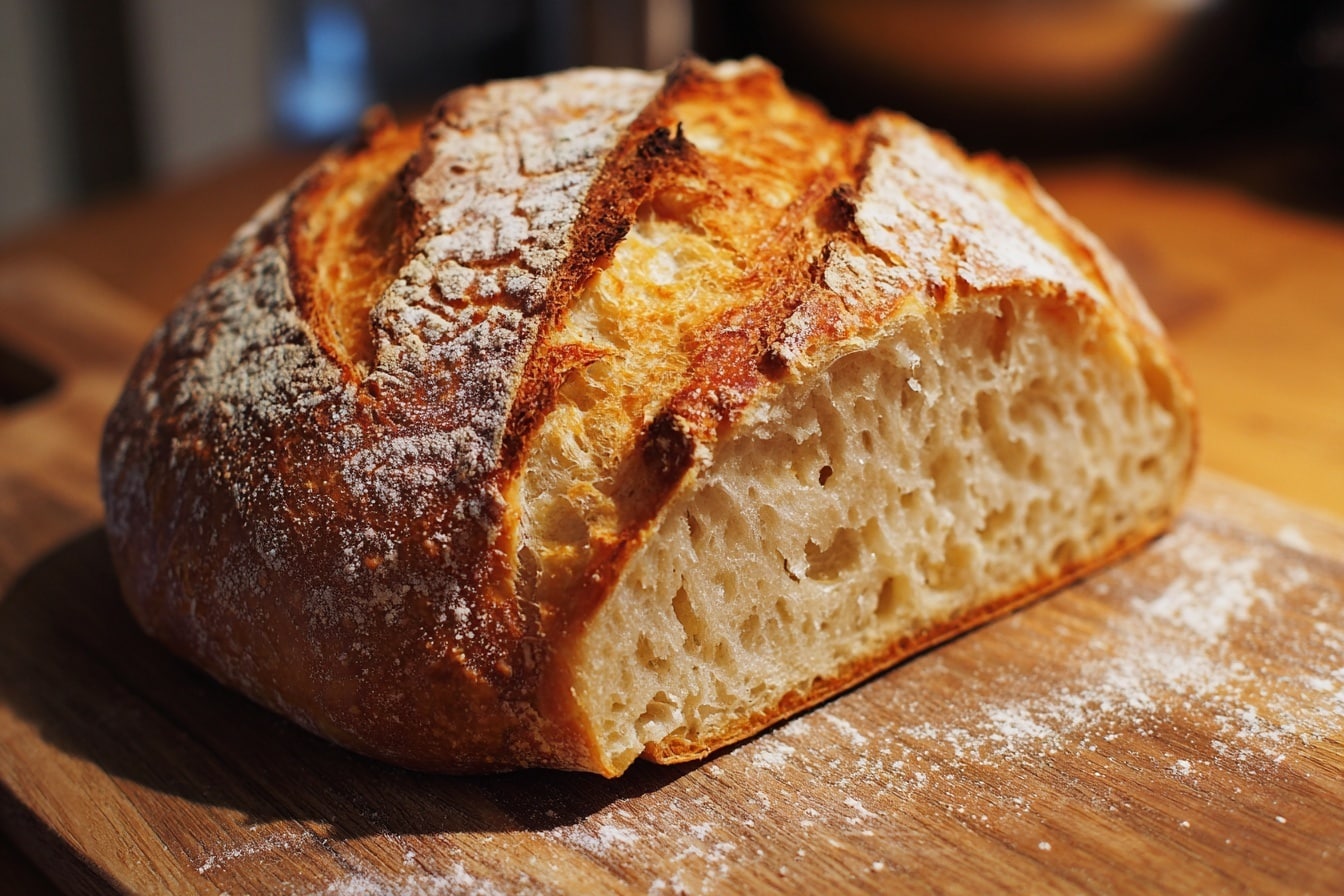
This classic sourdough bread features a chewy center and a crisp, golden crust, made with simple ingredients and natural fermentation. Baked in a Dutch oven, it requires no kneading and delivers bakery-quality results at home.
Ingredients
- 4 cups (500g) bread flour or all-purpose flour
- 1⅔ cups (375g) warm water
- 1 cup (200g) active sourdough starter
- 2 teaspoons (10g) salt
Instructions
- Step 1: In a large mixing bowl, combine the flour and warm water. Stir until a shaggy dough forms, then let it rest for 30 minutes.
- Step 2: After resting, add the active sourdough starter and salt. Mix well until fully combined.
- Step 3: Cover the bowl with a clean towel or plastic wrap and let the dough sit at room temperature.
- Step 4: Every 30 minutes for 2 hours, perform a set of stretch and folds: pull one side of the dough upward and fold it over itself; turn the bowl a quarter turn and repeat three more times.
- Step 5: After the final fold, cover the dough again and let it rise for 6 to 8 hours until it doubles in size and looks bubbly and puffy.
- Step 6: Gently transfer the dough to a lightly floured surface. Shape it into a round or oval loaf by folding and tucking the edges underneath.
- Step 7: Place the shaped dough seam-side up into a floured proofing basket or towel-lined bowl. Cover and refrigerate for 8 to 12 hours.
- Step 8: The next day, preheat your oven to 450°F (232°C) with a Dutch oven inside.
- Step 9: Remove the dough from the fridge and turn it out onto parchment paper. Score the top with a sharp knife or razor blade.
- Step 10: Carefully lower the dough into the hot Dutch oven using the parchment paper. Cover and bake for 20 minutes.
- Step 11: Remove the lid and bake uncovered for another 25 minutes until the crust is deep golden brown.
- Step 12: Remove the bread from the Dutch oven and let it cool completely on a wire rack before slicing.
Tips & Variations
- For a crispier crust, spray a little water inside the oven before baking or add a small tray of water to create steam.
- If you don’t have a proofing basket, use a bowl lined with a well-floured kitchen towel to shape the dough.
- Experiment with incorporating seeds or herbs into the dough for added flavor.
Storage
Store leftover sourdough bread at room temperature in a paper bag or bread box for up to 3 days to maintain its crust. For longer storage, wrap the bread tightly in plastic and freeze for up to 3 months. Reheat by warming in the oven at 350°F (175°C) for 10–15 minutes to restore crispness.
How to Serve
Serve this delicious recipe with your favorite sides.
FAQs
Can I use all-purpose flour instead of bread flour?
Yes, all-purpose flour can be used and will still produce good results, though bread flour may give a slightly chewier texture due to its higher protein content.
How do I know if my sourdough starter is active?
An active starter will be bubbly and doubled in size within 4 to 6 hours of feeding, and it should pass the float test—dropping a spoonful in water, it should float.
PrintClassic Sourdough Bread Recipe with Crispy Crust and Natural Leavening Recipe

This classic sourdough bread recipe yields a loaf with a chewy center and a crisp golden crust. Made with simple, natural ingredients and no kneading required, it uses a sourdough starter for natural leavening. The dough is fermented slowly, shaped, and baked to perfection in a preheated Dutch oven for an artisanal crust and texture.
- Prep Time: 45 minutes (including initial mixing, resting, and stretch & folds)
- Cook Time: 45 minutes
- Total Time: 15 to 18 hours (including fermenting and proofing times)
- Yield: One 10-slice loaf 1x
- Category: Bread
- Method: Baking
- Cuisine: French-inspired
Ingredients
Dry Ingredients
- 4 cups (500g) bread flour or all-purpose flour
- 2 teaspoons (10g) salt
Wet Ingredients
- 1⅔ cups (375g) warm water
- 1 cup (200g) active sourdough starter
Instructions
- Mix Flour and Water: In a large mixing bowl, combine 4 cups of flour with 1⅔ cups of warm water. Stir until a shaggy dough forms, then cover and let it rest for 30 minutes to allow the flour to hydrate.
- Add Starter and Salt: After resting, add 1 cup of active sourdough starter and 2 teaspoons of salt to the dough. Mix well until everything is fully combined and the dough comes together.
- Initial Rise and Stretch & Fold: Cover the bowl with a clean towel or plastic wrap and let the dough rest at room temperature. Every 30 minutes for 2 hours, perform a set of stretch and folds: pull one side of the dough upward and fold it over itself, turn the bowl a quarter turn, and repeat this 3 more times to build gluten strength.
- Bulk Fermentation: After the final fold, cover the dough again and allow it to rise for 6 to 8 hours until it doubles in size and appears bubbly and puffy.
- Shape the Dough: Gently transfer the risen dough to a lightly floured surface. Shape it into a round or oval loaf by folding and tucking the edges underneath to create surface tension.
- Final Proof: Place the shaped dough seam-side up into a floured proofing basket or a towel-lined bowl. Cover and refrigerate for 8 to 12 hours to develop flavor and improve the crust.
- Preheat Dutch Oven: The next day, place a Dutch oven into your oven and preheat it to 450°F (232°C) to ensure it’s thoroughly heated before baking.
- Score and Bake: Remove the dough from the fridge and turn it out onto a sheet of parchment paper. Score the top of the dough with a sharp knife or razor blade to allow controlled expansion during baking. Carefully lower the dough along with the parchment into the hot Dutch oven, cover with the lid, and bake for 20 minutes.
- Finish Baking Uncovered: Remove the lid from the Dutch oven and continue baking the bread uncovered for another 25 minutes to achieve a golden, crisp crust.
- Cool Before Slicing: Remove the bread from the Dutch oven and transfer it to a wire rack. Let it cool completely before slicing to ensure the crumb sets properly.
Notes
- The resting and stretch & fold steps develop gluten without kneading, resulting in a chewy texture.
- Using a Dutch oven traps steam during baking, mimicking a professional steam oven for a crisp crust.
- Cold proofing overnight in the refrigerator improves flavor through slow fermentation and makes the dough easier to score and handle.
- Make sure your sourdough starter is active and bubbly before using for best rise.
- Allow the bread to cool fully before cutting to prevent a gummy crumb.
Keywords: sourdough bread, no knead bread, artisan bread, Dutch oven bread, natural leavening, homemade bread